Monday, December 16, 2013

OnSong Bluetooth Pedal Onscreen iPad Keyboard Display Trick

OnSong / Bluetooth Pedal / OnScreen iPad Keyboard Display Trick


Okay gang, here’s a couple tricks for those of you using Bluetooth Pedals who also want to be able to access the iPad onscreen keyboard during your sets without having to bend over to push a tiny button on your pedal down on the floor (certainly not the most elegant looking thing to do in the middle of your show!).


(NOTE: I no longer have an Airturn so can not guarantee this will work with that unit, tho can’t really see why it wouldn’t. It works perfectly with the Pageflip Cicada pedal however.)


1. iPad (NOT Jailbroken) - This keyboard display "trick" will cost you $10 :

Pick up a little $10 Mini Bluetooth Keyboard from amazon or ebay (similar to this one: http://www.amazon.com/Bluetooth-Wireless-Keyboard-Computers-Included/dp/B0044IGBOI/ref=sr111?ie=UTF8&qid=1305458322&sr=8-11), and keep it somewhere handy beside you while onstage (on the edge of your piano, or velcro'd to your guitar strap, or in your pocket even! . . . it's a bit smaller than an iphone in size).


To start, turn on your bluetooth pedal and turn on your mini bluetooth keyboard whenever you run OnSong. (of course you've already earlier paired both with your iPad!)


Now, whenever you need to enter text into Onsong during a performance to search for a song or edit a song or whatever, just use the mini keyboard (if you're good with using those little keys), or if you prefer using the larger iPad onscreen keyboard like me, then just use the Mini Bluetooth Keyboard to “enable” the iPad onscreen keyboard ("Fn" + the number "3" key on my mini keyboard will bring up the iPad onscreen keyboard) then type onscreen as usual, bluetooth pedals still enabled and all!


No bending over middle of your set fiddling with tiny buttons on your pedal. All of this works with your Bluetooth Pedal still enabled and connected to OnSong.


(**By the way, you only need to enable the Onscreen keyboard this way once per session. After that, the onscreen keyboard will continue to pop up when ever you need it, UNLESS you "eject" it from the screen, if so, then you'll have to enable it again as above. 


You can even turn the bluetooth keyboard off once you've used it to enable the iPad onscreen keyboard and the onscreen keyboard will still pop up, unless you have ejected it of course.)


2. iPad (Jailbroken) - This keyboard display trick will cost you $0 - (Free!) :

If you are using a Jailbroken iPad, simply go to Cydia and search for and install a sweet little tweak (it’s free!) called “KeysPlease” by Erica Sadun. Once it’s installed put its App Icon right next to OnSong's or into your dock for easy access.


Before you open OnSong: 

First turn on your Bluetooth Pedal (which you of course have already paired with your iPad), then run the Keysplease app (it will just cycle on/off and instantly return to your iPad home screen), then open Onsong as usual.


Done in this order, everything will be functioning perfectly every time. (If you want to quick test it, as soon as OnSong opens, tap to open a Sticky Note and your onscreen keyboard will pop right up, bluetooth pedal enabled and all!)


Now, whenever you need to type anything in OnSong during your session the onscreen keyboard will magically appear, just like normal, even though your Bluetooth Cicada Pedal is still active!


Do your typing, and as soon as you return to your song performance page your pedal will still be functioning as normal (as a matter of fact it will even still be functional while you enter text in the song search box or song edit page and any pedal pushes will move the onscreen cursor).


Need to access the onscreen keyboard later in the show? No problem, thanks to Keysplease there’s your onscreen keyboard again, normal as ever, Bluetooth Pedal still active and all.  You only need to run KeysPlease once at the beginning before you start OnSong, and you're good to go for the duration.  Sweet!


No bending over. No fiddling with buttons on pedals down on the floor, or even other mini keyboards for this one.


  - - - - - - - - - - - - - - - - - - - - - - - -


Both #1 and #2 routines shown above work perfectly for enabling your iPad onscreen keyboard while using the Pageflip Cicada bluetooth pedal.


With KeysPlease in routine #2, you can use all three at the same time if you wish, your bluetooth pedal, the mini bluetooth keyboard, AND the iPad onscreen keyboard all at once.


Ta Dah!


(Have only tested all of the above on iPad 1 / iOS 5.1 . . . . .   cause that's all I got!)


Saturday, May 12, 2012

Acer Aspire One Netbook 2GB RAM Upgrade

Netbook: Acer Aspire One 532h-2807 model, Intel Atom N450
Ram: CORSAIR VS2GSDS800D2 PC2-6400 2GB 1X2GB DDR2-800 SODIMM Memory RAM Stick
OS: Windows 7 Ultimate (apparently all here should work equally well with Windows 7 Starter edition)

Pros: Good Price - $22 at NCIX (musta caught it on sale!)
Cons: AAO Netbook would not turn on at all with the 2GB Corsair chip installed, until I'd upgraded its Bios to the latest version (1.26 as of this writing).

The Experience:
The Corsair site has a great interface to find your ram for your specific machine.  (None of the other ram mfg even listed my specific model 532h).

Likewise, the Acer site has an equally easy interface to get you to the proper precise upgrade software for your specific product. 

Just wish the rest of the search had been so easy.  Spent far too many hours searching forums, youtube, etc, etc, etc, with very little luck on specifics in the end, both for what ram might work, how to's and what not to's, etc.  Everyone seeming to have different experiences so was very difficult to know just what to safely do in the end.

Did find some posts on the AspireOneUser forum (thanks everyone!) which let me know that the 6400/800 ram was the way to go, not the used 5300/667 I'd been looking at getting for $20.  In the end the faster Corsair stick was only $22 brand new (plus tax of course) but with that I had the option of return if it didn't work, something I thought I might have to do when first installed.

However, there were many different brands and sticks and configurations recommended and equally NOT recommended in the same moment so was indeed a challenge and bit of a gamble to know which way to go.

The Corsair RAM Stick: (First - Update the Netbook's BIOS!)
The Acer Aspire One Netbook 532h-2807 (N450) would not turn on at all with the new 2GB Corsair chip installed until I had updated the Aspire's BIOS from 1.08 to 1.26 (latest version as of this writing).  The Acer power button would light, the fan whir for a moment, and then nothing, just silence and a black screen, power button glowing nicely.

Unplug power and battery to allow restart and try again. Tried remove and reinstall the chip and reboot a few times too of course just to be sure but no luck.

So, reinstalled the old stick, run the Bios update, and once BIOS successfully updated to 1.26, with the new 2GB RAM stick installed the Netbook booted perfectly with all working smooth as silk.  (And yes, it already seemed faster.)

The Acer Bios Updater via Windows App:
Along with the newest Bios versions, the Acer site has a Bios Updater exe app that will run the complete bios upgrade right from within Windows so no need to use an external drive or usb stick or diddle with DOS etc for bios update or touch any other settings anywhere. 

All you have to do is download both the specific bios for your machine and the bios updater app from the Acer site to your netbook, unzip 'em, run the updater app, click OK, sit back and let it do its thing.   Very slick (and very quick!).
 
(...well, after I'd searched half the freakin' internet first trying to be sure nothing would go wrong!)

Okay, Let's Gamble:
Just went for it in the end as no real specific info or vids to be found, and absolutely no Bios Upgrade help docs at all on the Acer site, other than a warning in red text NOT to update the Bios unless instructed by them to do so. Huh?? Obviously just covering their asses in case you fry your machine in the process.

There's no docs with the updater app either, nada!, not a one, which was why I wasn't sure if had to run it from an external drive or not, or perhaps upgrade any other software or firmware before proceeding etc. There are too many stories online of folks sadly finding out only after their machine was turned into a lightweight boat anchor that some firmware upgrade was imperative to be done before upgrading the bios.  (And I don't even own a blowup dingy so absolutely no use for an anchor of any size!)

Finally just crossed my fingers and hit the okay button (or whatever it was called!) and it was over before I knew it! ...thankfully in a good way. That's why I'm posting this "review", hoping might help someone else down the road.

I can only assume if you have this same model of Aspire One, run the same Bios, get the same ram stick, that all shall work equally well for you.

Conclusion:
Success!
Obviously both the Bios and RAM upgrades went great once finally decided which brand and model chip to buy, and finally drummed up the courage to run the Bios Updater.  With all the warnings from other users on the net was a tad nervous might brick the 'book with the Bios update, or get a Ram stick that wouldn't work, but all is wonderful in the end. 

(Anybody wanna buy a used 1GB ram stick?  Ha!!)


Saturday, October 30, 2010

LinkSys E1000 Wireless Router

Fantastic, easy automatic setup, (and on a Mac to boot!). Really! Pop in the included CD, run the installer and just sit back and let the software do it all for you. Don't waste your valuable time on other routers like I first did.

First bought and returned a Belkin n150 (after my Belkin Wireless G router died), and a D-Link DIR-601, both huge hassles to attempt to get working. Belkin n150 set up reasonably easy but wireless only worked few minutes before refusing to give any wireless service whatsoever (which of course is what I'd bought it for). Spent hours trying (and researching) everything imaginable to get it to work before finally give up. Bought the D-Link DIR-601 hoping for better success, but never did manage to get the D-Link wireless capabilities up and running at all after too much time wasted yet again before run back to Fut Shop for the E1000.

E1000 was fully setup and WORKING(!) all by itself in mere minutes, all I had to do was sit back and watch it happen (iPhone connected instantly too!) everything piece of cake.

LinkSys Cisco install app even has a feature which will copy your full setup to a usb flashdrive which when inserted in another computer (as in your laptop or second home computer) will automatically install and set that computer up with all of your proper settings. Again, just plug in the flash drive, sit back and watch. Could not be simpler.

HUGE kudos to LinkSys/Cisco. All products should install this easy. (And work!!) Sweet!

Save your valuable time and far too much frustration with the others and pick this up. Sure would have saved me huge hassle, annoyance, and mega wasted time and run around had I just done so from the get go.

Couple Notes: 
• LinkSys E1000 works perfect with the iPhone too.  Old Belkin router that died used to need rebooting all the time to restore signal connection with the Mac (was a real pain).  Belkin router far too often also made it difficult for the iPhone to connect.  The LinkSys E1000 is performing with no issues whatsoever. iPhone connects instantly everytime, and no issues with it needing to be rebooted to restore wired connection with the Mac
.

• Lifetime Warranty - The dead Belkin router came with a 'Lifetime Replacement Warranty', but in the end proved more or less useless. Being responsible for all shipping and other costs (border inspection fees, customs fees, whatever) to return the dead router to Belkin for replacement could have cost same as to purchase a new router locally, not to mention being without a router for several weeks waiting for everything to be completed and replacement unit to arrive.


• All of the above mentioned routers worked fine directly wired to the computer. Only the LinkSys E1000 gave seemless, simple, instant wireless service.


Monday, September 1, 2008

Yamaha FC7 Expression Pedal - Barry’s Mixed Reviews

Yamaha FC7 Expression Pedal Review

SIMPLY THE BEST
Like many other reviews say, this is one of the very best expression pedals around. Nice long pedal sweep range (super for organ work or other delicate control), super solid design, stable, doesn't move around. Fully adjustable. You can even easily and securely attach multiple pedals together. And for only $38 incl shipping (http://www.sweetwater.com/store/detail/FC7/reviews/) you simply can't go wrong.


Only negative might be the cable being hard wired to the pedal. If it were a simple plug-in cable, if damaged it could easily and swiftly be replaced with another in a live gig situation. The way it is should it get damaged on stage you'd better be fast and handy with a screwdriver and solder iron.


WORKS WITH ROLAND KEYBOARDS TOO!
Really, it does! To work perfectly on Roland, Nord, M-Audio, and other keyboard brands, you just need to reverse the polarity on the FC7 Pedal jack. An adapter jack is preferred here so that you can easily use your FC7 with any keyboard regardless its polarity requirements. (If you're not up to wiring your own adapter, spend a few bucks on the FC7X or FC7X-II adapter cable mentioned in other reviews - http://music.ashbysolutions.com/misc.html - and your Yamaha FC7 Pedal will then work fine with all keyboard brands.) **Update: it appears this item is no longer available.

You could reverse and re-solder the wiring right at the pedal or at the plug end, but then your FC7 would no longer work with Yamaha gear. Once you have an adapter jack you’re always set for any keyboard. (Would be super nice if Yamaha would just put a polarity switch right on the pedal like some other manufacturers. You could of course wire up and install a polarity switch of your own and thus avoid the need for an adapter jack altogether.)

Here's another very easy way to reverse the polarity using two stereo y-jack adapter cables together:


Reversing the connections as shown in the photo, reverses the polarity of the pedal.


CONTROL TWO SEPARATE KEYBOARDS USING ONE FC7 PEDAL!
You can also "y-jack" the Yamaha FC7 pedal into two (or more?) separate keyboards and control each at the same time from the one pedal.

**Note: If controlling a Yamaha and Roland together (or other kbds which require opposite polarity), the polarity adapter jack mentioned above goes on after the y-jack, then into the Roland or whatever. If you put the polarity adapter before the y-jack then the Roland will respond fine but your Yamaha kbd won't respond correctly because it will now be receiving reverse polarity.


ADJUSTABLE
And did I mention, the pedal is adjustable for sitting or standing playing positions? Simply loosen a screw underneath, reset the angle, re-tighten and you're done.

Also, there is a spring-loaded "solo" crescendo feature which you can enable and adjust likewise. When enabled, press hard down on the spring loaded final throw of the pedal for your solo or crescendo boost, then when you're done ease off with your foot and the pedal will return precisely to your preset max.


BOTTOM LINE
Bottom line, the Yamaha FC7 Expression Pedal is simply the best expression pedal you can buy for the money. Bar none. Enjoy!


© Copyright 2008 Barry's Mixed Reviews

Tuesday, August 5, 2008

TrendNet USB Wireless works on Apple Powerbook G3

The TrendNet USB TEW-424UB 802.11g Wireless USB 2.0 Adapter works with Apple Lombard Powerbook G3 laptop computer. (Apple Powerbook Lombard 333mhz, 320ram, OS X Tiger 10.4.11.)

(I presently have it installed using a 2 port Dynex USB 2.0 PCMCIA cardbus card purchased from Future Shop, which also works fine on the Apple Powerbook by the way and of course give you super fast USB 2.0 speeds for your hard drives as well at the same time via the second USB port on the card! Sweet!! However, the Trendnet TEW-424UB wireless works just fine in the powerbook's own regular usb 1.0 ports as well.)


BENEFIT OF USB WIRELESS OVER PCMCIA

One great feature of using the USB Wireless over a regular pcmcia cardbus wireless card, is that with a pcmcia wireless card the cardbus is of course filled with that card so you are then unable to utilize any other pcmcia cards (USB 2.0, Firewire, etc) if you are currently surfing the net via the pcmcia wireless cardbus card.

Using the USB Wireless dongle, the pcmcia slot is free for either the pcmcia USB 2.0 card as in my case, or a pcmcia firewire card or whatever else you might desire. If you are surfing via the USB dongle, any downloads can also take advantage of the USB 2.0 ports for super fast disc copy etc. And should you need to do any fast disc transfer work, you won't have to disconnect your wireless as you would with a pcmcia wireless card to allow you to insert your USB 2.0 or Firewire card.


I've yet to test the unit at any great distances from the base station, but unless you're hoping to surf from somewhere "down the block" from the wireless source, I seriously doubt it shall be a problem.


WAKING FROM SLEEP
One issue with the TrendNet TEW-USB wireless dongle, is that the Mac only appears to want to recognize it from a full startup or restart. If you simply wake the Mac from sleep, the dongle won't work, even if it was already going when you put your Mac to sleep, or if you try unplugging and reinserting it. Bit of a pain but not a major deal breaker by any means. (I got the Trendnet for a mere $18 at Future Shop, so a little restart issue is no major cost.)


TRENDNET TEW-424UB DRIVER
You will have to download the Realtek USB WLAN Client Utility (sorry, don't have the link available at present - you'll have to Google for it) and follow the usual install and setup instructions so the Trendnet USB wireless dongle will work with your Mac. (I am using Realtek driver version 1.5.1A, but you may want to try other versions).

The Realtek Driver software appears to be glitch free (other than the inability to access the dongle after the powerbook has been to sleep). I do have two Realtek icons in my Apple Dock for some reason, but everything is working fine regardless. (Perhaps I unknowingly have two versions installed, hence two icons?)

If you go to "About This Mac" under the Apple on your menu bar then click on the "More Info" button, then click on USB in the list under "Hardware", it will show exactly what Realtek chip is installed in your Trendnet dongle - mine is RTL8187B.)


Anyway, this "review" is being done on the fly so is a bit spotty at best, but hope it might help someone looking for inexpensive wireless options for Apple Mac computers on the cheap. If you're willing to invest a bit of time, the Trendnet TEW-424UB will indeed work.

Should I too find more time to invest here, I'll try to post some links and more install info. - but don't hold your breath!

Cheers!

© Copyright 2008 Barry's Mixed Reviews

Monday, September 24, 2007

Cyber Acoustics Acoustic Authority A3780 Pro Series Computer Speaker System Review

Cyber Acoustics Acoustic Authority A-3780 Pro Series Computer Speaker System Review:
 
BarrysMixedReviews.blogspot.com

[UPDATE: Some updates have been added. since original review posted Sept 2007.]
 
(UPDATE Dec 2013 - Tho the tricks and info below are still relevant and applicable, the speaker systems mentioned in this post are no longer in production or available for purchase new. You'll have to find 'em used if you want one.)
 
 
Pic of Cyber Acoutics A-3780 Pro Series Computer Speaker System:


Summary: Great sound, great price (New approx $100 - $130 range). Blows away many systems costing three times the price.

Pros: Tons of power (180watts total. Subwoofer: 100watts. Satellites: 2x40watts), Fabulous sound, espec for the price. Absolutely huge bass capablilities from the Subwoofer. Two way satellites speakers give nice crisp sound. Extra long cable lengths make setup easy. Company stands behind the product, even if bit slow to complete warranty replacement process.

Cons: "Mouse style" Speaker Controller Pod very high failure rate (turns out its poor quality wires - see below). Subwoofer output might be too “hot” even at lowest levels for some tastes. System is fairly heavy if you plan to move it around as I do. You don't have to be a weightlifter but the Sub definitely has some heft to it.  Of course most folks will just set it up and leave it so weight is not an issue. This model, the 180 watt A-3780 is unfortunately no longer made.

Another con is the proprietary plug used on the Control Pod, almost impossible to replace or repair if anything should happen.

[The A-3780 Pro Series replacement system, the "new" A-3780RB, is only 135watts (see below), not 180watts and sadly its sound quality not anywhere near that of the original A-3780.]


Overall:
Great system. Huge sound. Especially for the price. Aluminum heat-sink on back of Sub to help cool unit. “Mouse style” Speaker Controller Pod great design with nice long cable which plugs into back of the Sub allowing easy pod and speaker placement. Controller Pod has On/Off Switch, Master Volume, Sub Volume, and mini stereo Headphone Jack which will automatically silence the speakers when headphones are plugged in.
(Just too bad about its poor quality wires - see below.)
 
High quality dual speaker Satellites also have nice long wires for equal freedom and ease of placement. Nothing worse than being forced to put your speakers or controller pod where you don’t want them just because they didn’t give you enough wire. No problem with that here!


Speaker Controller Pods: Poor reliability wire/plug connection - (turns out its poor quality wires!)

Unfortunately the mouse style Speaker Controller Pods are hugely unreliable.
 
FIVE of them have failed on me (two A-3780 Pro Series, one A-3780RB, and two A-3640RB models) despite the fact I have always used the most extreme care and caution in handling them.

When the Control Pod fails, you will think the entire system has blown (which I of course did), often first one channel fails, then the other, and finally the Sub, if indeed the entire unit didn’t stop all at once, but after now enduring several such failures with different units, experience seems to now indicate it is these mouse-like Controller Pods which are the problem (the connector jack on the end of the cable it would seem) and not the speaker systems themselves which are dying.
 
Systems I assumed now permanently toast (as in never to work again) came magically back to life when a new Speaker Controller Pod unit was plugged into the back of the offending units Subwoofer. Surprise, surprise! (And a delightful one at that! - even if short lived.)


Fixing the “Pod”
 
Unfortunately finding a replacement plug (9-pin Mini Din, 10mm diameter) with which to repair the connector end of the Speaker Controller Pod wire, has proven hugely difficult if not impossible to find.
(At the time of this writing still haven’t acquired any replacement parts with which to effect repairs. Will post a link here below should I find a supplier.)

Requests for possible schematics to assist in repairs after several months now also still await Cyber Acoustic’s managing to find and send them to me.
 
UPDATE: After considerable effort finally managed to get the documents from Cyber Acoustic, though they didn't exactly make it easy.

 
**UPDATE: Fixing the “Pod”
Finally Some Success! ....well, sort of:
 
At last managed to find and order 9-pin replacement plugs but they are simply impossible to solder up being so tiny. (And a good thing in the end too as turns out the plugs weren't the problem, the wires are.)
 
After far more mega searching finally found and purchased better quality 9-pin cables with the plugs already attached, then cut the cables in half giving two "new" cables with connectors.
 
Dismantled and removed the old cable from the mouse controller pod, and after first carefully determining which wire needed to go where, soldered on the new 9-pin cables. 
 
These new cables work great and are far more robust than the original.  Turns out the original mouse pod connector wires are far too delicate and break inside. 

Replacement connector cables can be found at www.stockcable.com. (Sorry, the direct link is broken.....  once there look for "9pin mini din".)


The A-3780RB is NOT the A-3780 Pro Series!
 
The "not as good" A-3780RB replacement system which Cyber Acoustics now sells and sent to me as an A-3780 Pro Series replacement, is NOT 180 watts as far too many sites declare. Even the A-3780RB box wrongly states it is 180watts but such is not the case.
 
The A-3780RB is only 136 watts total RMS (see link below) and unfortunately even though its satellites are identical to the Pro Series its sound output and quality suffers considerably in comparison to the original Pro Series A-3780.


Here's a pic of the A-3780RB replacement system, the one you DON'T want, ....well, I didn't anyway! :-)
 
136 watts total: Satellites - 32 watts/ch x 2; Sub - 74 watts.


http://cyberacoustics.com/index.cfm?fuseaction=Home.ProductDetail&content_id=334]


Only the original A-3780 Pro Series system is 180 watts (Subwoofer = 100 watts. Satellites = 2x40 watts).

The original A-3780 blows the "new" A-3780RB out of the water when it comes to sound quality. Huge difference. Instantly noticeable. On top of the Pro Series A-3780’s extra power, quite possibly its different Subwoofer design might also significantly improve its overall sound quality.

The 136 watt A-3780RB shown here is still a reasonable sounding unit but nothing compared with the original A-3780.

So, if you want the better sounding original A-3780 Pro Series, sorry, you'll have to find it used. (It’s really a shame they stopped making it.)

(The original A-3780 system shown at the top of this page, which has a large black sound port on the left side of the sub, not the small oval gray hole on the front like the A3780RB, is the one you want to look for if searching for a used one.)


Portable PA System!  . . . . using Computer speakers???

 
Yup!
 
Actually using these systems now at live gigs as a small PA System (have used A-3780, A-3780RB, and A-3640RB models), running piano, bass, electric drum, and vocals(!) through them, in quite large venues and at considerable volume levels.
 
Volume output has never been an issue, though the less powerful A-3640RB system can more easily get pressed to its limits along with it's poorer quality satellites, and doesn’t sound as sweet as the A-3780 Pros, however the A-3640RB is also half the weight so is far easier to carry around if your sound needs aren't quite as serious.

The 180 watt A-3780 Pro Series has a very nice crisp sound thanks to its higher quality satellites (like the sub woofer, these too are twice as heavy as the A-3640’s), with absolutely tons of bass available, sometimes even a bit too much! A separate EQ would allow cutting the bass output while still allowing the Sub to be turned fully up to utilize its full power output of 100 watts.

I find the sound of this setup far “larger”, “smoother”, and "fuller" than anything that might be gotten from any compact PA system I’ve tried. I’m sure it’s having the Sub which makes all the difference to the sound over a standard small P.A.. Small to medium PA systems can’t manage such nice “full” bottom end, especially at low or moderate volume levels, unless they too have a Sub.
 
At one gig when still using the replacement A-3780RB which suddenly refused to run mid-song due to my then as yet undiscovered pod control wire issues, I plugged instead into their name brand house PA system sporting two substantial two way speaker cabinets, and even though it too was stereo and assuredly far more power overall than the A-3780RB, despite all manner of tweaking the sound quality was terrible in comparison to the A-3780/A-3640RB systems.
 
I suffered through of course, but following that carried one of my “spare” A-3640RB systems with me just in case, until I finally discovered and undertook the pod wire fix.

[Once I discovered that it’s the Speaker Controller Pods which are the problem and not the entire speaker system itself, I only carry a spare Speaker Controller Pod. Fortunately I've never needed to use it since I installed the new cables, but it's always there for extra assurance.) 
 
(**UPDATE: Dec 2013 - Still doing several gigs a week since 2007 with the A-3780 Pro Series, everything working perfectly since replacing those wonky pod control cables. System has turned into quite the work horse. Who knew!]


PA System Mixer
 
The tiny mixer I use only has EQ on the first two vocal channels. (Behringer UB 1002FX) The mixer’s stereo channels don’t have EQ so, because I like to run the keyboard in stereo, other than from the keyboard itself I’m not able to reduce the bass EQ on the Piano, Bass Guitar, and Elec Drum, so things can get a tad boomy depending on the room and how high I have the Sub turned up.
 
One of these days I may pick up a larger mixer with EQ on those channels so I can tweak EQ from them too, but I like the tiny footprint of the 1002FX which sits perfectly right on top of the Roland RD700 Piano just above the right hand end of the kbd.

The A-3780 (or A-3780RB and A-3640RB) systems have even handled venues with a couple hundred people, having easily more than adequate sound output for vocals, piano, bass, and drum. Wouldn’t want to crank a full live band through it needless to say, but the system performs surprisingly well!
 
 
**UPDATE: HUGE Improvement
Have since purchased Behringer's Xenyx 1202FX Mixer  http://www.behringer.com/EN/Products/1202FX.aspx   giving separate three band EQ control on vocals AND the RD700 piano, bass, and drums.  Far superior sound control. 
 
Can actually turn the A-3780 Sub up full volume now, and roll off bass on each channel individually (by running RD700 into channels 3+4 panned L-R accordingly to maintain stereo separation). 
 
Now utilizing the full 180 watt power of the A3780 system instead of having to keep the sub turned way down to avoid extreme bass output.  Far superior to using the old 1002FX mixer with no EQ for the RD700.  The Xenyx 1202FX still fits nicely sideways on the RH side of the RD700, just hangs over the front edge couple inches.
 
1202FX Mixer
 

Satellite Speaker Stands - Dead Simple! - Very Inexpensive

 
In trying to find some sort of stand to mount the satelittes on for live perfomances, I searched high and low and tried many different ideas and stands but found nothing that was easily portable, reasonably stable, and not too obtrusive looking, not mention wouldn’t cost a bundle.
 
After considerable searching and trying various things in various price ranges, I finally came upon the idea of using a couple of light weight camera tripods. (Duh! Took me long enough!)

I bought two light weight aluminum camera tripod stands (approx $20ea), each of which also handily came with two easily detachable mounting plates which you would normally attach to your cameras and then easily slip the cameras on and off the top bracket on the tripod.

The Cyber Acoustic A-3780 Satellites (and A-3640RB) each conveniently (or is that thoughtfully?) have a threaded metal mounting machine screw hole on their backs. I simply took one of the satellites into the hardware store, found the proper threaded screws, then easily drilled a hole through two of the aforementioned plastic tripod mounting plates, inserted the screw through the hole, then screwed the plate to the back of each satellite.
 
Pic of tripod mounting plate secured on back of satellite speaker:


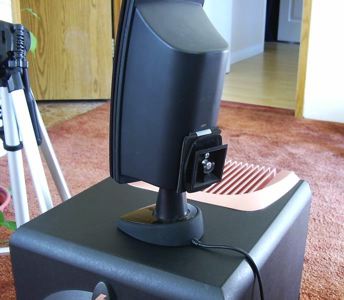
With these mounting plates permanently attached to the backs of the satellites, at the gig I simply slip the mounting plate into its slot on the top of the tripod and latch it in place. Ta-Da!
 
Of course the speaker height can easily be adjusted with both the tripod leg extensions or the telescoping center pole, and on top of all that the satellite speaker can then even be tilted up or down and swivelled left and right in any direction with the numerous adjustment features found on the top of the camera tripod. Pretty slick! Dead simple!
 
Pic of tripod mounting bracket on the left, which holds satellite mount plate:


Side view of satellite mounted on tripod.
 

Lightweight! Inexpensive! Easy to set up and take down! And because the plates are screwed to the back of the satellites and do not interfere with the base in any way, the satellites can still be simply placed on a shelf or table for more “regular” use.
 

Bonus: Double Duty!
After all that I can still instantly use the tripods for cameras because each tripod came with two of the removeable attachment plates, even though two plates are now permanently attached to the backs of the satellites, the other two plates are still available for camera use should I need it!. Cool!


© Copyright 2008 Barry's Mixed Reviews